Text Overlay, step by step
Put a Snapchat, POV, POV TikTok or plain text on one or many vertical videos, typed by you or suggested by the AI, then adjust, check and render.
Text Overlay puts a text on one or many vertical videos: a Snapchat-style black band, an outlined "POV: …", a TikTok text at the top of the frame, or a plain text. You type the text yourself or let the AI suggest several, after listening to and looking at the video. Six steps: Import, Analyse, Text, Adjust, Check, Export.
Step 1: Import
Drop your vertical videos, a folder or a ZIP into Vertical videos to caption. Only the audio track and a few frames leave it, for the analysis. Click Continue to analysis.
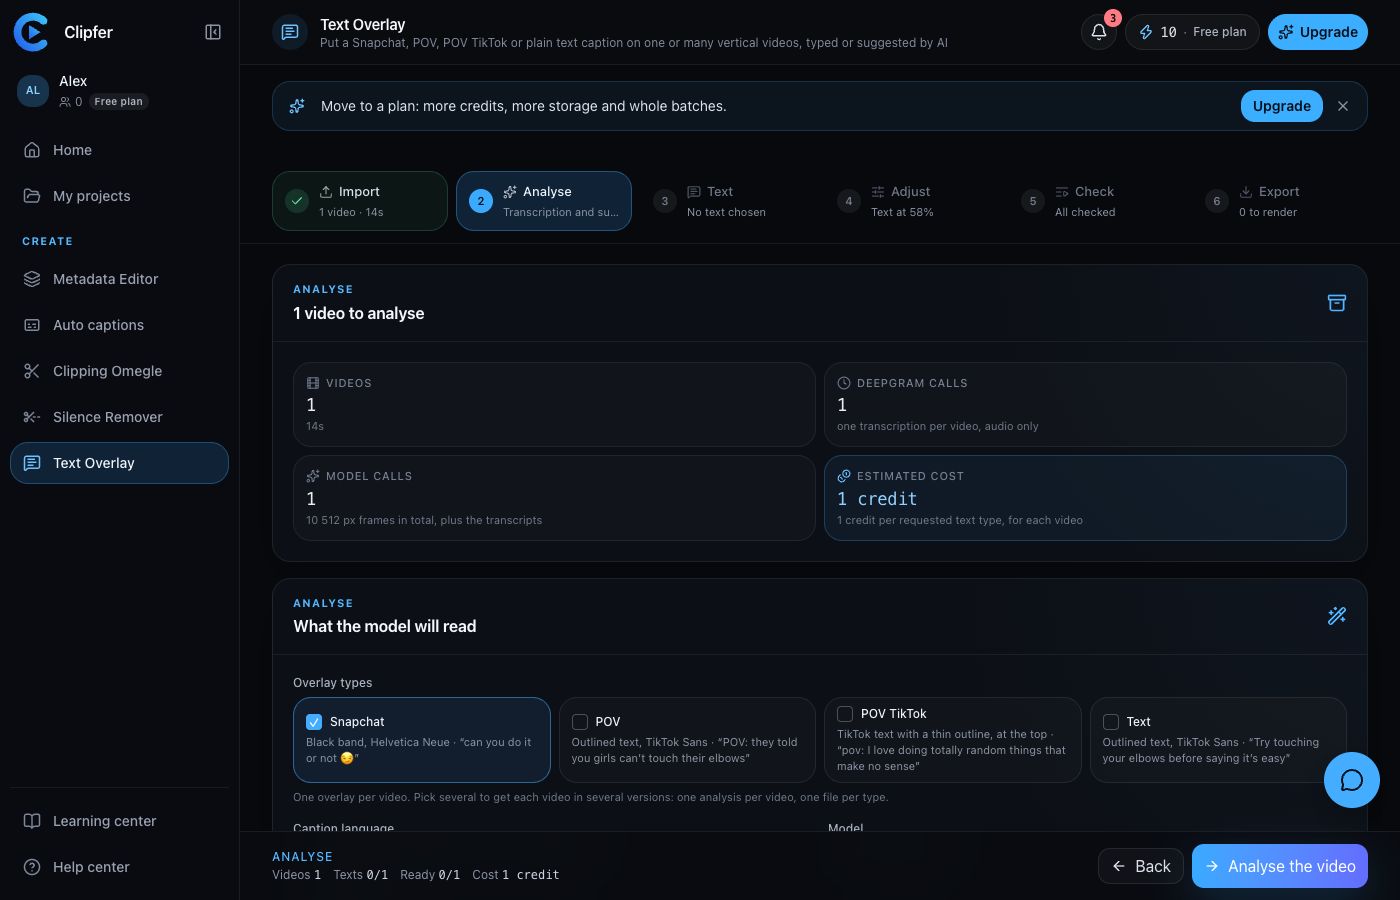
Step 2: Analyse
- Under Overlay types, tick one or more types. One overlay per video and per type: with two types ticked, each video comes out as two files, for a single analysis.
- Pick the Caption language: Automatic (the language most videos speak), French or English.
- Add Extra instructions if you like (for example "funnier tone", "first person", "under 50 characters").
- Click Analyse N videos, or choose Type the captions myself to skip the analysis and pay nothing.
The four types:
| Type | Look |
|---|---|
| Snapchat | Black band, Helvetica Neue · "can you do it or not 😏" |
| POV | Outlined text, TikTok Sans · "POV: they told you girls can't touch their elbows" |
| POV TikTok | TikTok text with a thin outline, at the top · "pov: I love doing totally random things…" |
| Text | Outlined text, TikTok Sans · "Try touching your elbows before saying it's easy" |
The Snapchat style uses Helvetica Neue, found on Macs and iPhones; on another computer, the tool says so and that type cannot be rendered.
Step 3: Text
For each video, the Text panel shows the field Type the caption, or pick a suggestion below and, if the analysis ran, the Suggestions list sorted by style (Curiosity, Humour, Question, Reaction, Situation, First person). Click Use to place a suggestion, edit it freely, or ask for a Variant. A video with no text will not be rendered. The analysis and the suggestions are detailed in Typing it yourself or getting suggestions.
Step 4: Adjust
The Style panel sets the look of the text, type by type:
- Text position: drag the text vertically on the preview, use the arrow keys, or the Quick positions (Top, Upper, Centre, Lower, Bottom).
- Font, Text size, Line height, Max lines, Text colour, Outline (colour and thickness), and for Snapchat the Band (colour, opacity, inner padding).
- Display duration: Whole video or Custom (start and end).
The Same settings for every video option applies position and style to the whole batch for that type; turn it off to set one video separately, or use Apply this position to all N videos. A warning appears if the text leaves the area TikTok, Reels and Snapchat keep visible. Back to the original settings undoes your changes.
Step 5: Check
What will be rendered goes through each video with its text, its position and its display duration. Adjust sends you back to the previous step for a given video; Approve all and export opens the export.
Step 6: Export
Click Render N videos and confirm the cost. The video service burns the text in and checks the produced file. Download each video or Download all as ZIP. If you change a text or a setting after the render, the file is marked settings changed since: export again to get it up to date. Output files get a neutral name and cleaned metadata.
Cost
Two separate lines: 1 credit per requested text type, for each video at the AI analysis (nothing if you type the captions yourself), then 1 credit per minute of rendered video at export, every started minute with a 2-second allowance. An analysis that suggests nothing and a failed render are refunded; rerunning an already-paid analysis is not charged again.